Interpump Maintenance & Troubleshooting Guide
Interpump pumps demand predictable maintenance to sustain industrial and pressure-washer operations across Indonesia. This guide outlines systematic service intervals, diagnostic protocols, and repair-versus-replace criteria tailored for buyers sourcing through 3G Electric Indonesia. Orders process in IDR with delivery to Jakarta, Surabaya, and Bandung within 6–10 business days, including Bea Cukai customs clearance (typically 3–5 days). Follow these steps to minimize downtime and extend equipment lifespan.
Understanding the Interpump Pump Range
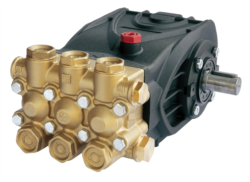
Interpump manufactures a broad portfolio of positive-displacement plunger pumps used in industrial cleaning, agriculture, motor-pump assemblies, and pressure-washer systems. The 3G Electric catalog lists over 4,000 Interpump references, spanning Industrial Pumps (736 models), Pressure Washers (109), Motor Pumps (105), Spare Parts (32), Agriculture Pumps (7), Accessories (6), and Valves (5). Understanding where your unit sits in that range — its rated flow, pressure, and shaft speed — is the starting point for any maintenance or fault-finding exercise.
Key Operating Parameters at a Glance
The table below summarises a cross-section of Interpump industrial pump models available to order through 3G Electric. Always verify the nameplate data on your specific unit before setting relief valves or selecting replacement seals.
| SKU | Power | Flow | Max Pressure | Speed | Weight |
|---|---|---|---|---|---|
| T01750Y-H001 | 16.17 kW (22 hp) | 50 L/min (13.2 US gpm) | 172 bar (2500 psi) | 1750 rpm | 18.5 kg |
| W00956-000 | 3.67 kW (5 hp) | 13.6 L/min (3.6 US gpm) | 145 bar (2100 psi) | 1750 rpm | 7.7 kg |
| E1B1810B-000 | 3.46 kW (4.7 hp) | 10 L/min (2.64 US gpm) | 180 bar (2610 psi) | 1450 rpm | 5 kg |
| E1B1614IS-000 | 4.26 kW (5.8 hp) | 14 L/min (3.69 US gpm) | 160 bar (2320 psi) | 1450 rpm | 5 kg |
| C2W2011-000 | 4.19 kW (5.7 hp) | 11 L/min (2.91 US gpm) | 200 bar (2900 psi) | 1450 rpm | 7 kg |
| E1E1811CW-000 | 3.75 kW (5.1 hp) | 11 L/min (2.91 US gpm) | 180 bar (2610 psi) | 3400 rpm | 5 kg |
| WW1510BV-000 | 2.94 kW (4 hp) | 10 L/min (2.64 US gpm) | 150 bar (2175 psi) | 2800 rpm | 5.2 kg |
Preventive Maintenance Schedule
Consistent preventive maintenance is the single most effective way to extend service life and avoid unplanned shutdowns. Use the intervals below as a baseline; adjust downward in abrasive, high-temperature, or continuous-duty applications.
Daily / Pre-Shift Checks
- Inspect the crankcase oil sight glass — level must be within the marked range; top up with the grade specified on the pump's nameplate or data sheet.
- Check all inlet and outlet hose connections for weeping or drips.
- Listen for unusual knocking, rattling, or cavitation noise during the first minutes of operation.
- Verify that inlet supply pressure (or suction head) is within the pump's stated requirement — restricted inlet is the leading cause of cavitation damage.
- Confirm that the unloader or bypass valve is functioning and not holding the pump against a dead-head condition.
Every 250 Operating Hours (or Quarterly)
- Change crankcase oil — use the viscosity grade stamped on the pump housing or specified in the OEM data sheet.
- Inspect plunger seals and packing for weeping; replace if any visible moisture is present in the oil.
- Check inlet and outlet valve seats and balls/discs for wear, pitting, or debris embedment.
- Inspect the spray gun (e.g. GUN P10, SKU ZP10X-000, rated to 200 bar / 3000 psi and 140 °C) for trigger-seal wear and lance O-ring condition.
Every 500 Operating Hours (or Annually)
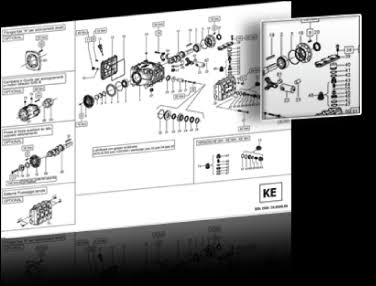
- Replace all plunger seals and O-rings as a complete kit — do not mix old and new seals in the same head.
- Inspect plunger surfaces for scoring; measure diameter against the specification stamped on the plunger or available from the OEM spare-parts list.
- Check crankshaft bearing play and connecting-rod clearances.
- Inspect the manifold for hairline cracks, especially around valve ports.
- Verify coupling alignment on motor-pump assemblies (e.g. T01750Y-H001 at 1750 rpm, 16.17 kW) — misalignment accelerates bearing and seal wear.
Systematic Troubleshooting Procedure
Work through the steps in order. Skipping ahead wastes time and risks misdiagnosis.
Symptom: Low or No Pressure Output
- Confirm the drive motor is reaching rated speed (check nameplate rpm — e.g. 1450 rpm, 1750 rpm, or 2800 rpm depending on model). Under-speed reduces both flow and pressure proportionally.
- Check the inlet supply: measure suction pressure or verify that the feed tank is full and the inlet strainer is clean. Cavitation from a starved inlet mimics valve failure.
- Inspect the unloader or pressure-regulating valve — a stuck-open unloader bypasses all flow back to tank and produces zero downstream pressure.
- Remove and inspect inlet and outlet check valves. Look for debris on the seat, a cracked ball or disc, or a broken spring. Clean or replace as needed.
- Check plunger seals: remove the pump head and look for scoring on the plunger surface or extrusion damage on the seal lips. A blown seal allows high-pressure fluid to bypass back to the crankcase.
- If pressure is present but below rated value, verify nozzle orifice size — an oversized nozzle reduces system pressure even when the pump is healthy.
Symptom: Excessive Noise or Vibration
- Isolate the source: determine whether noise originates from the pump head (hydraulic knock) or the crankcase (mechanical knock).
- Hydraulic knock — check for cavitation (restricted inlet, air entrainment) or water hammer from rapid valve closure. Slow the inlet valve opening and check for air leaks on the suction side.
- Mechanical knock — check crankshaft bearing play and connecting-rod clearances. Worn bearings produce a rhythmic knock that increases with load.
- Check coupling alignment and torque on motor-pump assemblies. A misaligned coupling transmits bending loads into the crankshaft.
- Inspect the mounting frame for loose fasteners; vibration at operating speed can loosen hardware within weeks on high-cycle applications.
Symptom: Oil Contaminated with Water (Milky Appearance)
- Immediately shut down the pump — continued operation with emulsified oil accelerates bearing wear.
- Drain and flush the crankcase completely.
- Identify the ingress point: inspect plunger seals and the low-pressure seal (wiper) behind each plunger bore. Water enters the crankcase when the wiper seal fails.
- Replace the complete seal kit for all plunger bores — do not replace only the failed seal.
- Inspect plunger surfaces for corrosion pitting before reassembly; a pitted plunger will destroy new seals within hours.
- Refill with fresh oil to the correct level and run briefly at low pressure before returning to full load.
Repair vs. Replace Decision Guide
- Repair: Seal kits, valve balls/seats, and springs are cost-effective to replace if the manifold, plungers, and crankcase are undamaged. Interpump spare parts (32 references in the 3G Electric catalog) cover the most common wear items.
- Replace the pump head: If the manifold shows cracks, corrosion pitting deeper than the surface layer, or thread damage in valve ports, replace the complete head assembly rather than attempting repair.
- Replace the pump: When crankshaft bearings are severely worn, the crankcase is cracked, or cumulative repair cost exceeds approximately 60–70% of a new unit's price, replacement is the economically sound choice. The compact footprint of Interpump units (e.g. 194.5 mm envelope on the E1B and E1C series) makes direct swap-out straightforward.
Spare Parts and Ordering
Always identify your pump by the full SKU stamped on the nameplate before ordering spare parts. Interpump uses model-specific seal kits, valve kits, and plunger sets — cross-contamination between series (e.g. E1B vs. E1C vs. WW series) is a common ordering error. 3G Electric lists Interpump spare parts and accessories available to order; lead time is confirmed at quotation based on current supply-chain status.
Frequently Asked Questions
How often should I change the oil in an Interpump pump?
Change crankcase oil every 250 operating hours or quarterly, whichever comes first. In high-temperature or continuous-duty applications, shorten the interval. Always use the viscosity grade specified on the pump's nameplate or OEM data sheet — never substitute an unspecified grade.
What causes milky oil in an Interpump pump crankcase?
Milky oil indicates water ingress through a failed plunger wiper seal. Shut down immediately, drain and flush the crankcase, replace the complete seal kit for all bores, and inspect plunger surfaces for pitting before refilling with fresh oil to the correct level.
Why is my Interpump pump producing low pressure despite running at the correct speed?
The most common causes are a stuck-open unloader valve, worn inlet or outlet check valves, blown plunger seals, or an oversized nozzle orifice. Work through the six-step low-pressure diagnostic sequence above before disassembling the pump head.
Can I mix old and new seals in the same pump head?
No. Always replace all seals in a pump head as a complete kit. Mixing aged and new elastomers creates uneven compression loads and the older seals will fail prematurely, requiring a second teardown shortly after the first repair.
What is the maximum temperature rating for Interpump spray gun accessories?
The GUN P10 (SKU ZP10X-000) and AUTOMATIC SPRAY GUN P10 (SKU ZP10-000) are both rated to 140 °C (284 °F) at up to 200 bar (3000 psi) and 40 L/min (10.56 US gpm). Operating above these limits voids the component's service life and creates a safety hazard.
How do I know whether to repair or replace my Interpump pump?
Repair is cost-effective when only wear parts (seals, valves, springs) are damaged and the manifold and crankcase are sound. Replace the pump when the crankcase is cracked, bearings are severely worn, or cumulative repair cost approaches 60–70% of a new unit's price.
What information do I need when ordering Interpump spare parts from 3G Electric?
Provide the full pump SKU from the nameplate (e.g. E1B1810B-000), the specific part type needed (seal kit, valve kit, plunger), and your required quantity. Lead time is confirmed at quotation. Avoid ordering by model name alone — many Interpump series share similar names but use different internal components.
Is cavitation a common problem with Interpump pumps, and how do I prevent it?
Yes. Cavitation from a restricted or undersized inlet line is the leading cause of premature valve and seal failure. Ensure inlet pipe diameter meets the pump's suction requirements, keep the inlet strainer clean, minimise suction lift, and avoid sharp bends close to the pump inlet port.